Routing Tokens Across Modes
A practical approach to contextual theming in Figma.
—
As design systems scale to support multiple brands, surfaces, and themes, our token and variable architecture needs to account for more than just light and dark. We often need multiple layers of context, such as inverse surfaces, accessibility contrast, marketing versus product UI, or brand-specific rules. This is where I apply a method I call routing across modes.
Wait. Routing?
Routing refers to a middle-layer variable setup that maps tokens across multiple theming dimensions. It lets you define how variable values resolve through several cascading contexts, essentially threading a path through a matrix of design decisions.
Let’s say you want to have the following modes in Figma:
Brand (Primitive): Brand A, Brand B
Theme (Semantic): Light, Dark
This is a straightforward setup: your brand color palettes at the bottom (primitive) layer, and light/dark themes at the top (semantic) layer.
Now imagine you want to add a third mode in between that introduces a surface context for components:
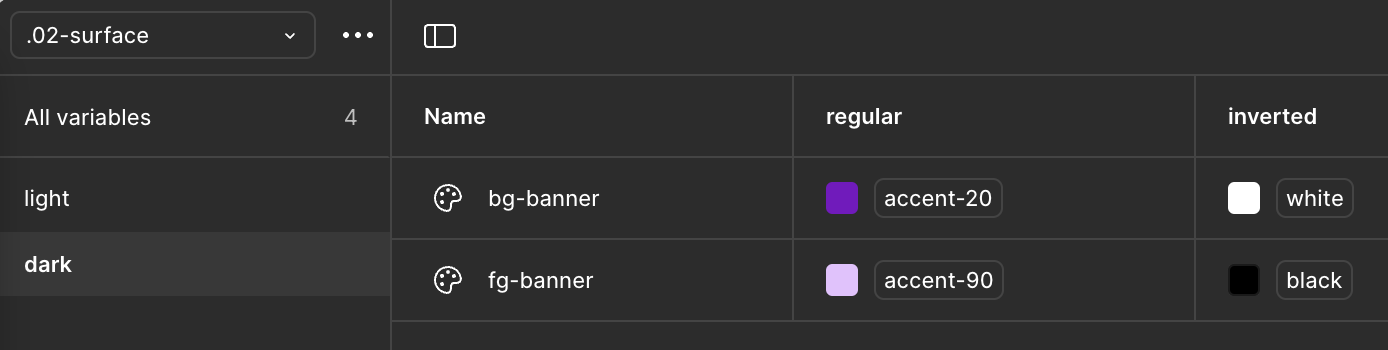
Surface: Regular, Inverse
Surface context helps components adapt to the background they sit on. A button in a banner, for example, might look different on a brand-colored background, or need an inverted version when placed over an image, since the image won’t change across light and dark modes.
Instead of creating a single massive theme for every possible combination, you break it into layers. Each variable collection holds a specific piece of the puzzle, and routing connects them.
How Routing Works
Each middle layer becomes a matrix. For the example above:
The Surface layer needs regular and inverse modes.
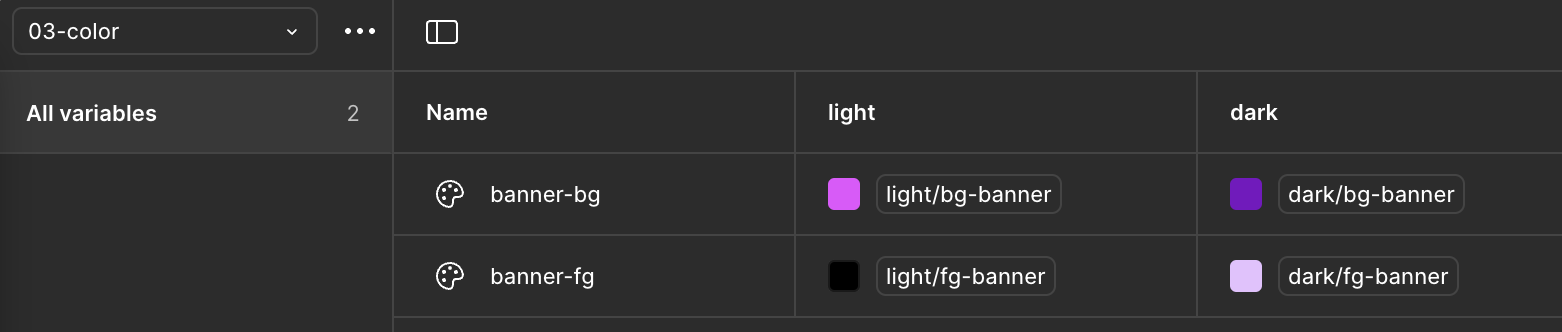
Within each mode, you group tokens by the modes of the layer above it (e.g. Light and Dark).
Tokens are prefixed with mode names, creating a predictable taxonomy that’s easier to scan and reference.
Figma will expose appearance dropdowns for each routed layer in the right sidebar, allowing designers to toggle between combinations like “Brand A · Inverse · Dark” without needing a separate theme.

Applying It in Practice
In a real world scenario, your routed variables might look like this:
button-bg→light.button-bg→accent-60(Light mode, regular surface)button-bg→light.button-bg→global.white(Light mode, inverse surface)button-bg→dark.button-bg→accent-40(Dark mode, regular surface)button-bg→dark.button-bg→global.white(Dark mode, inverse surface)
Note how the light and dark prefixes in the middle layer provide granular control. Each step in the chain contributes to the final resolved value. Routing makes these decisions modular, traceable, and adaptable.
Some best practices to keep this setup manageable:
Use consistent token names across all groups within each layer.
Group variables in a way that mirrors your mode structure (light/dark, regular/inverse, etc).
Route additional layers as needed to support more contexts.

A well-structured system scales design decisions across real-world contexts without added complexity. Routing variables through contexts supports flexibility across brands, themes, and product needs – but too many layers can make it harder to maintain. It’s important to carefully choose dimensions that matter.